ParaView server
When computations have been performed on a cluster or require significant graphic resources, it may be interesting to post-process the results on a visualization server. In this tutorial the configuration of a ParaView visualization server and the procedure to connect to it is presented.
Install ParaView
To install Paraview on your server directly go to the official ParaView website. Under Linux section you can find either full suite of ParaView tools including ParaView GUI client or the headless version if don’t plan to render with an X server. For the example we will download the complete version and unzip it:
$ wget -O ParaView-5.8.1-MPI-Linux-Python3.7-64bit.tar.gz "https://www.paraview.org/paraview-downloads/download.php?submit=Download&version=v5.8&type=binary&os=Linux&downloadFile=ParaView-5.8.1-MPI-Linux-Python3.7-64bit.tar.gz"
$ tar -xvf ParaView-5.8.1-MPI-Linux-Python3.7-64bit.tar.gz
$ rm ParaView-5.8.1-MPI-Linux-Python3.7-64bit.tar.gz
Important
Note that it is strongly recommended to use the same ParaView version on the client side to avoid incompatibility problems.
Setup ParaView server
In order to easily run ParaView executables we will add its bin folder to the PATH environment variable.
Assuming ParaView has been installed into the folder /home/userName/Software/ we can edit the path as:
$ sudo echo 'export PATH=/home/userName/Software/ParaView-5.8.1-MPI-Linux-Python3.7-64bit/bin:$PATH' >> /home/userName/.bashrc
$ source /home/userName/.bashrc
To start ParaView server run the pvserver executable with the MPI executable provided by ParaView (-np 1 for sequential use):
$ mpiexec -np 1 pvserver --force-offscreen-rendering
Waiting for client...
Connection URL: cs://serverName:11111
Accepting connection(s): serverName:11111
By default we can see that a ParaView server has been started on the server serverName (will be replaced by the actual name of your server) and is waiting for connection on the port 11111.
If one would like to change the default port, one can add the option --server-port=XXXXX.
Note
The script run-pvserver.sh available in the script folder of ECOGEN allows to easily set the path to ParaView (and avoid setting manually the PATH variable) and start a server as described above.
Here is an example to set the path and start the server for the 1st time:
$ ./run-pvserver.sh --path /opt/ParaView-5.8.0-MPI-Linux-Python3.7-64bit/bin/
Path has been set to /opt/ParaView-5.8.0-MPI-Linux-Python3.7-64bit/bin/.
$ ./run-pvserver # Using default number of core, i.e. single core
Waiting for client...
Connection URL: cs://cid:11111
Accepting connection(s): cid:11111
More information is given in the help menu of the script: ./run-pvserver.sh --help
Connect to ParaView server with client
Prerequisites
To access to the ParaView server we need to forward a port from the client machine (localhost here) to the server machine (serverName).
As stated in the reference below it will allow the ssh client to listen for connections on a given port, once a connection is received the ssh client will tunnel to the ssh server.
Lastly, the ssh server connects to an another destination given port, i.e. the one used by the ParaView server.
This procedure is called local forwarding and is configured with the -L option. On the client machine one can use:
$ ssh -X -N -L localhost:11111:serverName:11111 user@serverName
Here it has been added options -X to enable X11 forwarding (to export application display) and -N to specify that it is not necessary to execute a remote command (stick only to port forwarding).
Be aware that the previous command will not give any output and will stay up until you would like to end-up the connection. If you would like to set this command to background add the -f flag.
To avoid to remember the previous ssh command an alias can be added:
$ vim ~/.bash_aliases
alias ssh-port='ssh -X -f -N -L localhost:11111:serverName:11111 user@serverName'
Now to do to port forwarding run:
$ ssh-port
Reference: ssh tunneling
ParaView client usage
The final step is to connect to the ParaView server directly from your ParaView client. To proceed, open the ParaView client GUI and click on the Connect button:

Fig. 18 Connect button on ParaView GUI.
Add your server as described below (keep manual configuration and save):
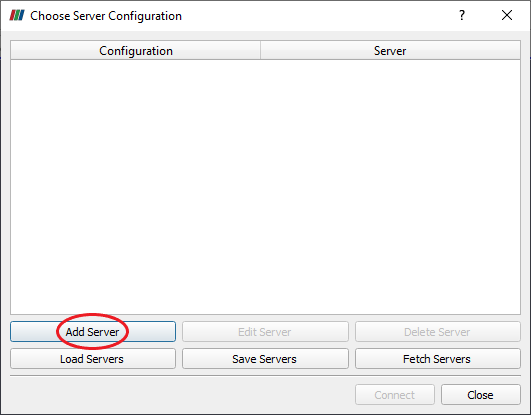
Fig. 19 Initial server list.
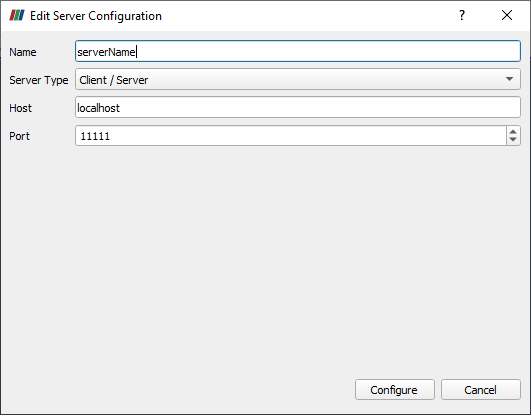
Fig. 20 Server configuration.
Connect to your server:
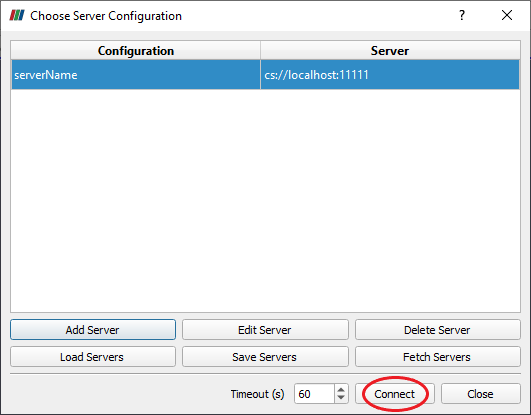
Fig. 21 Final server list.